


Removing old wallpaper can feel intimidating, but with the right steps, you can handle Wallpaper Removal like a pro — and protect your walls in the process. Outdated wallpaper can make your space feel tired and dated, but trying to rip it down without the right prep can cause gouges, torn drywall, and costly repairs. Whether you’re planning to repaint or hang new wallpaper, the first step is getting Wallpaper Removal done the right way.
1. Gather Your Tools
Proper tools make wallpaper stripping much easier and help prevent accidental damage. Here’s what you’ll need for effective wallpaper removal:
- A wallpaper scraper or wide putty knife
- A scoring tool (for stubborn wallpaper)
- A sponge or spray bottle
- Bucket of warm water mixed with vinegar or wallpaper removal solution
- Drop cloths or plastic sheeting
- Painter’s tape
- Ladder for hard-to-reach spots
- Optional: Wallpaper steamer for tough, old wallpaper
Having these tools ready will save you time and help you tackle any surprises.
2. Prepare the Room
Wall preparation is key. Start by removing as much furniture as you can or push it to the center and cover it with plastic sheets. Protect your floors with drop cloths to catch debris and excess water.
Next, use painter’s tape to cover electrical outlets and switches. For extra safety, turn off power to any outlets you’ll be working near — you’ll be using water, so this step is important.
Take off any switch plates or outlet covers so you can reach every bit of wallpaper.
3. Test Your Wallpaper Type
Not all wallpaper is the same. Before you start full-on DIY wallpaper removal, figure out what type you’re working with:
- Strippable wallpaper: This modern type often peels away in large sheets without much fuss.
- Peelable wallpaper: The top layer comes off easily, but a paper backing stays behind and needs soaking.
- Traditional wallpaper: Older types or multiple layers will likely need soaking, scoring, and more effort.
Gently lift a corner and pull slowly to see which you have.
4. Protect Your Walls: Loosen the Adhesive
For wallpaper that doesn’t peel away easily, you’ll need to soften the glue underneath.Combine warm water and either wallpaper removal solution or white vinegar, then apply it using a spray bottle or sponge.Liberally apply it to the wallpaper, working in small sections so the water stays warm.
Let the solution soak for at least 15–20 minutes. This is a crucial step in preventing damage — the softer the glue, the less force you’ll need when scraping.
5. Score Tough Wallpaper
If you’re working with stubborn or vinyl-coated wallpaper, using a scoring tool can make a big difference. Lightly roll the tool over the surface to create tiny perforations, allowing the water or removal solution to soak through and loosen the adhesive underneath. Take care not to press too firmly — you want to score just the wallpaper, not damage the drywall behind it.
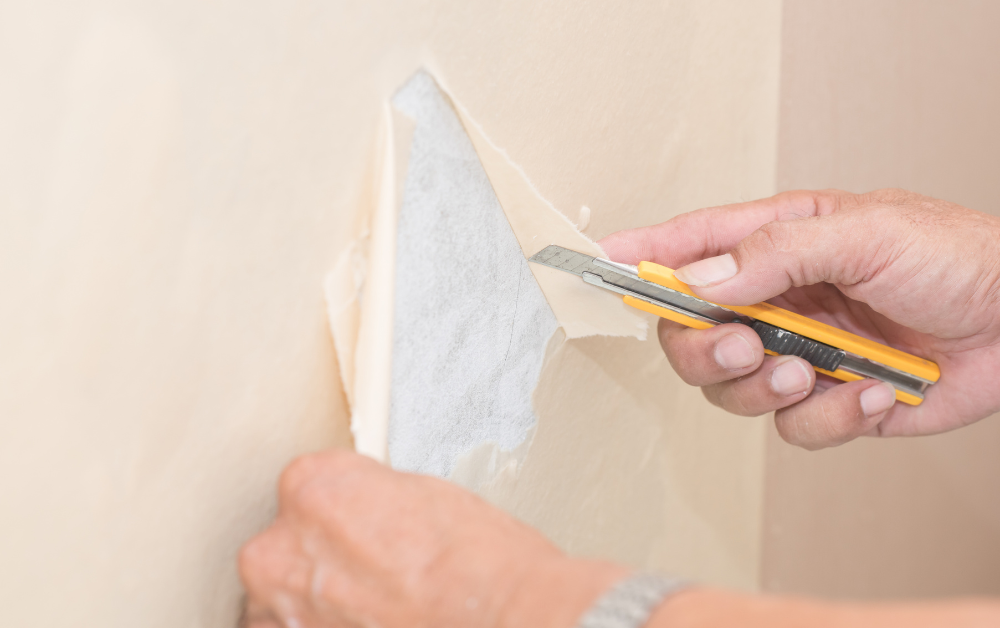
6. Scrape Carefully
Once the wallpaper is wet and the glue is softened, it’s time for the main step in wallpaper stripping: scraping. Use a wallpaper scraper or wide putty knife to lift the edges. Work carefully, keeping the scraper angled close to the wall. Scrape in the direction away from you to minimize accidental gouges.
If a section resists, don’t force it. Reapply the solution and wait a few more minutes. Patience here means you’re less likely to damage the surface underneath.
7. Use a Wallpaper Steamer for Stubborn Areas
If your wallpaper simply refuses to budge, consider using a wallpaper steamer. Steamers loosen stubborn adhesive using heat and moisture. They’re especially helpful for old wallpaper that’s been painted over.
Always follow the manufacturer’s instructions. Keep the steamer moving so you don’t overheat any one spot and risk softening or damaging drywall.
8. Clean Up Residue
Once all the paper is off, check your walls for leftover glue. Use warm, soapy water or a commercial adhesive remover to scrub away any residue with a sponge.
A clean wall is essential for whatever comes next — whether that’s painting, adding fresh wallpaper, or applying a decorative finish.
After cleaning, rinse the wall with plain water and let it dry fully for at least 24 hours before any new paint or wallpaper goes up.
9. Final Tips for Damage-Free Wallpaper Removal
Always start small and gentle — don’t rip or force sections off.
Keep tools sharp and clean to avoid scraping gouges into the drywall.
Work in sections so the removal solution doesn’t dry before you get to it.
Protect outlets and floors to avoid water damage.
If you’re not confident, hire a local professional who specializes in wallpaper removal.
Conclusion
With a bit of patience and the right tools, you can handle DIY wallpaper removal confidently and protect your walls from costly damage. Following these steps ensures your walls stay smooth and ready for whatever fresh new look you have planned.
Taking your time and using the right methods can save you from having to repair or patch drywall later — and you’ll love the fresh, clean slate you’re left with when the old wallpaper is gone.


